

“I just got the manuscript back from my editor, and it’s covered in green. What do I do now?”
Note: This article will read much the same as “Tracked Changes: Resolving Edits in Word.” I’ve just changed the details to fit Google Docs.
If you’ve never worked with tracked changes before, it can seem overwhelming. The thing to remember is that this method helps you retain control of your manuscript. You can see everything the editor changed and exercise your final say over all recommendations. If you take it one step at a time, it’ll become second nature.
Different Approaches
There are two main approaches to resolving edits:
- You accept, reject, or modify each edit yourself, or
- You reply to the comment for each change you disagree with; the editor will incorporate those decisions and resolve the remaining edits.
The first option is great for people who like tight control over their work (like me); the second leaves less room for introducing new errors into the manuscript. Both methods are valid—just make sure you and your editor discuss which to use when you negotiate the contract.
Keep in mind that edits will fall into two categories:
Noncontroversial edits: These involve changing something wrong into something right. For example, your editor might fix an error in subject-verb agreement. This type of edit should not be rejected unless you have a very good reason, and even then you should probably discuss it with your editor. For example, you might want to leave it as-is because it appears in dialogue or because the narrator is using a nonstandard dialect. If you simply think the editor is mistaken, again, please bring it up with him or her.
Subjective edits: These involve issues that are subject to a judgment call. The original text might require a change but could be modified in many ways, or perhaps it was okay as written but the editor is suggesting an improvement. This type of edit is a lot more open to author modification or rejection.
Making Your Own Edits
If you do this part wrong, it might cost you extra money. So read carefully!
It is completely natural for you to make changes of your own while you’re reviewing the editor’s work. Sometimes when they suggest a rewording, you think of an even better alternative. Or perhaps your editor recommended that you add a little more description or more vivid action or clarify an ambiguous point.
But STOP RIGHT THERE for a minute.
PLEASE USE TRACKED CHANGES WHEN YOU MAKE ANY EDITS TO THE MANUSCRIPT.
This is very important. When you track your own changes, the editor can easily find the new material and review it without having to reread the entire manuscript.
If you do not track changes, you’ll risk leaving errors in or find yourself paying extra for another close read-through.
Yes, your editor can use the version history in Google Docs to see what was changed, but this is much, MUCH more cumbersome than tracked changes and may still cause you to incur further charges.
Track. Your. Changes.
Here’s how to do it:
Google Docs refers to tracking changes as “suggesting” mode. To toggle the mode, look for the button just beneath the blue “Share” button:
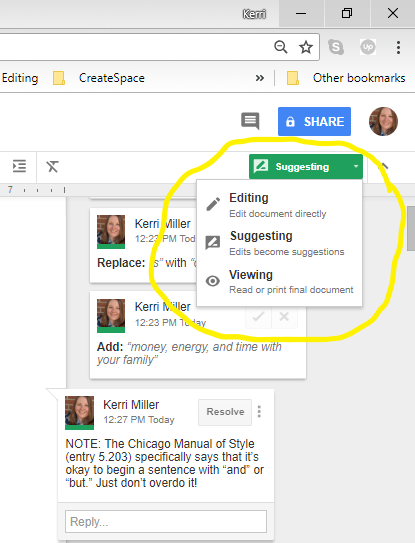
You have three options for interacting with a Google Docs file:
- Editing mode: Changes are not tracked. This is the default mode for files you create. You can still see what changes you’ve made by reviewing the version history, but this can become time-consuming, especially with a large number of changes.
- Suggesting mode: This is the mode that tracks your changes. Please use this mode while making any revisions your editor (or coauthor) needs to review.
- Viewing mode: In this mode, no edits can be made at all. You might toggle this mode to ensure you don’t mess up a finished file with accidental keystrokes, or you might share the file with someone as “viewing only” to ensure they can’t edit it. (This is good for beta readers.)
Now you’re ready to make changes of your own!
Resolving Tracked Changes
As I said, you have three options with any given edit: keep it, reject it, or make an alternate change. This section will assume you’re resolving the edits yourself. (If you plan to leave comments and have your editor do the actual resolving, then you’ll follow the steps below in “Addressing Comments.”)
First, here’s a reminder of what tracked changes look like in Google Docs (from “Intro to Tracked Changes,” the first article in this series):

When you add text (with “suggesting” mode on), it appears in green. When you delete, the text remains visible but turns green and has a strikethrough. Besides the color, there’s a very important difference between Google Docs and Word: Each edit automatically generates a comment in the margin (read more about that under the subheading “Google Docs: Automatic comments for every edit” in the intro article).
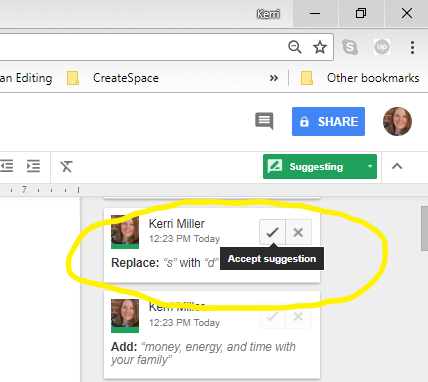
1. It isn’t always clear which comment in the margin goes with a particular edit in the text. If you aren’t sure, then you can either click on edited text or click on a comment: The comment will jump a little to the left, and the edited text will be bracketed (top and bottom) in green:

2. If you want to accept an edit, click the check mark in the top-right corner of the comment box:
3. If you want to reject an edit, click the “X” in the top-right corner of the comment box:

Addressing Comments
Your editor will leave different types of comments in the margin. These may include:
- Praise for strong writing decisions
- Explanations of certain changes
- Suggestions for further change or action
- Questions
The first two types are for your information only, and you can hide them after reading.
*** I do NOT recommend deleting them. In “Resolving Edits in Word” I recommended deletion, but that’s because you still have a copy of the file with all comments (in your email from the editor). In Google Docs, however, unless you’ve saved a separate copy to work with, this may be the only file with a record of your editor’s comments. So please hide them instead.
But the ones in red are actionable. This means you need to make some kind of change yourself or do additional legwork, such as researching the correct procedure for building a campfire or requesting permission to include a quote from a copyrighted work.
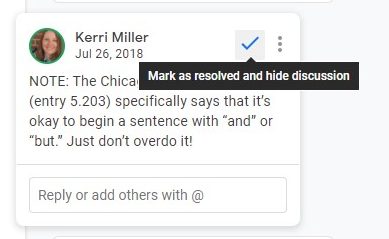
To hide a comment, simply click on the comment box to select it, then click the check mark in the top right:
For some actionable comments, you’ll make changes directly in the text (see instructions on using tracked changes yourself, above). For others, you’ll need to reply to the comment. To do that, click on the comment, then click in the “reply” box and begin typing. Be sure to click the “reply” button when you’re finished, or else it won’t be saved.

Viewing a Clean Copy
Sometimes you may want all the green to go away so you can check how a paragraph flows and make sure everything looks right if the changes are accepted. Here’s how to do it:
1. Click the “Tools” menu:

2. Click the small down arrow to the right of “Show suggested edits” to pull down a menu:

3. Select “Preview ‘Accept all'”:

4. Now you will see the document as if all changes were accepted:

Conclusion
That should get you started! If you’re one of my clients and you hit a snag, be sure to contact me for help.
Also, check out part one of this series, Intro to Tracked Changes. If you need instructions for Word, check out Tracked Changes: Resolving Edits in Word.
Utopian Editing provides editing services from concept through proofreading. Click here to request a free sample edit and quote.


Leave a Reply